![]()
Digital Infrared Photography - Tutorial
Basics
# Camera
# Lenses
# Filter
# WhiteBalance # Settings # Postprocessing # Special
Basics - What is Infrared?
Infrared radiation - often refered to as thermal radiation - is part of the optical radiation and thus of the electromagnetic spectrum. It starts at the longer wavelength end of the visible spectrum. Its wavelength range is 780 nm to 1 mm. Its subdivided into shortwave IR-A (780 - 1400), IR-B (1400 - 3000) and longwave IR-C (3000nm - 1mm) spectrum. In Infrared photography only the IR-A spectrum is relevant.
(Source: Bundesamt für Strahlenschutz)
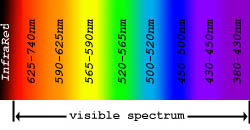
Fig. 1: Visible Spectrum
Camera
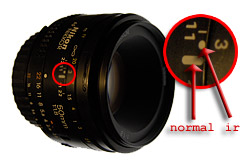
Not all digital cameras are usable for infrared photography. In principle all digital camera sensors are sensitive to the IR spectrum, but the manufacturers put filters in front of the sensors to protect them from IR rays. This is because the overlap of IR with visible light leads to a loss of sharpness. The trend is, to put even stronger Anti-IR-Filters into modern cameras. It is easy though to figure out whether one's camera is sensitive to IR. Just take a picture of your TV remote control while pressing a button on the remote (choose longer exposure times). If your camera is able to capture IR light, then on the image you should see a light where the IR diode of your remote control sits. If there is nothing to see, try longer exposure times but eventually your cameras IR filter is to strong.

Fig. 2: Infrared-Test
Lenses
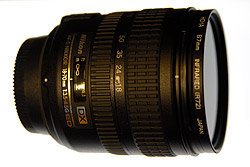
All lenses could be used for IR photography if an IR filter can be fitted to it (otherwise a Cokin filter system might be usable). But unfortunately some lenses have a coating that is not usable with IR photography as a so called hot spot is produced. This means the picture is much brighter in the middle than at the edges. Another issue is, that lenses are not specifically made for IR radiaton. This normally leads to reduced sharpness of the pictures and different indefinate position. Due to the different wavelength of IR, the distance scale on the lens is not usable anymore. Some lenses have an IR position on the focus scala (IR index).
On my Nikkor AF3,5-4,5/18-70 DX lens I have found that infinite position is just before the right end of the infinite symbol. Autofocus will usually not work with IR filter on, as the filter is to dark. Sometimes it may work but you should always check on the LCD after a test shot.
Here is a list of IR- usable and unusable Canon-Lenses: Lens Summary for IR
Filter
To shoot IR you require a filter that blocks the visible light but is diaphanous for Infrared radiation. These filters are available with different wavelengthes from various photo equipment dealers. For short exosure times, images with a rest of visible light, couloured IR, you should buy a light IR filter such as the Hoya R72 (720nm) or a Heliopan IR-715 (715nm). The wavelength indicates from which wavelength on the filter is diaphanous. For B&W infrared you may try a darker filter like the Heliopan RG 830 (830nm) but this will lead to longer exposure times and a slightly different IR effect, depending also on the IR sensitivity of your camera.
My recommendation for Nikon D70 DSLR is here.
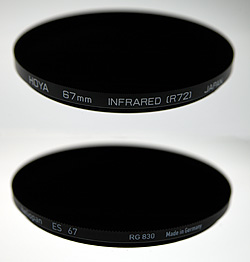
Fig. 3: Infrared Filter
Normaly whitebalance is used to adjust the camera to the colour temperature of the light at the shooting site. With Infrared the colour temperature is mainly dictated by the deep red colour of the IR filter. Thus the whitebalance has to be performed with IR filter on. Only few cameras are able to do a usable auto whitebalance, usually it has to be done manually. This procedure differs from camera to camera, please refer to the manual of your camera. In principle you shoot a picture of something (usually a grey card) and the camera uses this as reference for the colour temperature.
For Infrared instead of a grey card you can also use
- green sunny grass (filter on)
- blue sky (filter on)
- a red monitor (no filter on, not the best solution)
I have obtained the best results with wb on a green sunny grass area (Nikon D70). Please use exposure times of at least one second for the wb with filter on.
The examples on the right side show picture without filter, with filter but auto WB and finally with filter and WB on green sunny grass - no postprocessing except sizing. The red picture cannot be well used anymore for a colour IR, as the some tone components are missing.
Special recommendations for WB with Nikon D70 here.
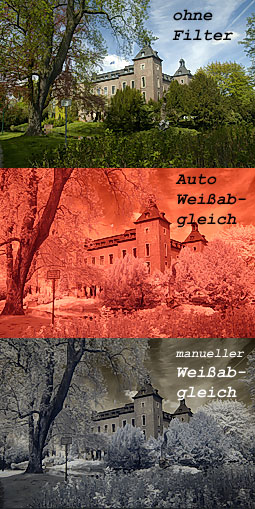
Fig. 4: WB comparison
Settings
Of cause the camera settings are of highest importance to obtain a good result. As WB is of most important, I have put it into a seperate section. Now let's look at the other settings.
Due to the dark IR filter and the IR cut filter built into the camera, usually exposure times are much longer than usual. The exposure settings may differ from camera to camera, depend on the motiv and of cause on the light situation.
Sensitivity (ISO)
The best choice here depends on the IR sensitivity of the camera and the necessary exposure times. To reduce noise there has to be a compromise between sensitivity and exposure time. Usually it is better to use lower sensitivity with longer exposure times. With my Nikon D70 I experience best results with ISO 200 under "normal" IR conditions (landscapes in bright sunlight). Of cause with exceptional situations, like some people in a pub I might use ISO 1600 and a flash. But this is something you usually do not do in IR.
Shooting Mode
Due to the nature of IR photography, the camera internal metering is not very exact. It is recommended to use the Manual mode of the camera and to figure out the best exposure by try and error. The best combination of aperture and exposure time depends on filter used, camera model, ISO sensitivity and light situation.
As a guidance for the Nikon D70 on a very sunny day with blue sky and little clouds I use:
ISO 200 # Aperture 8 # Exposure 1-2 seconds # Hoya R72 filter
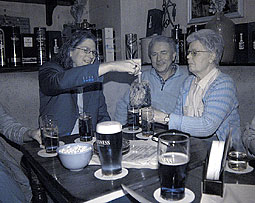
IR in a pub: ISO 1600, Aperture 3.5, Exposure 0.77 sec. & Flash
Fig. 5: Infrared - the different way
collection
(back)
my fotohome
fotocommunity
